In this guide, I will show you how to set up FTP Server on your Windows Server 2019.
Step 1
The first thing we need to do is open the Server Manager. In the window that opens, select Add roles and features.
Step 2
On the main page hit the button Next
Step 3
On the next page — Installation Type you should choose Role-based or feature-based installation.
Step 4
In Server Selection — Select a server from the server pool. Chose the server and hit the button Next.
Step 5
You should select server roles for FTP server installation. In my case, it’s Web Server(IIS).
After a checkbox, you will get a submitting form. Hit the button Add Features.
Step 6
Now you just need to click Next, since you do not need any additional components.
Step 7
Hit the Next button.
Step 8
Now you should remove all unnecessary checkboxes. Check only FTP Service and IIS Management Console and click Next.
Step 9
Confirm the installation of roles and components. Restart the destination server automatically checkbox is checked so after the installation the server reboots itself.
Step 10
Installation progress.
FTP server is successfully installed. The next step is to create an FTP user and an FTP site.
How to create FTP Users
In order to create a new user, click on Tools in the Server Manager, and from the drop-down list select Computer Management.
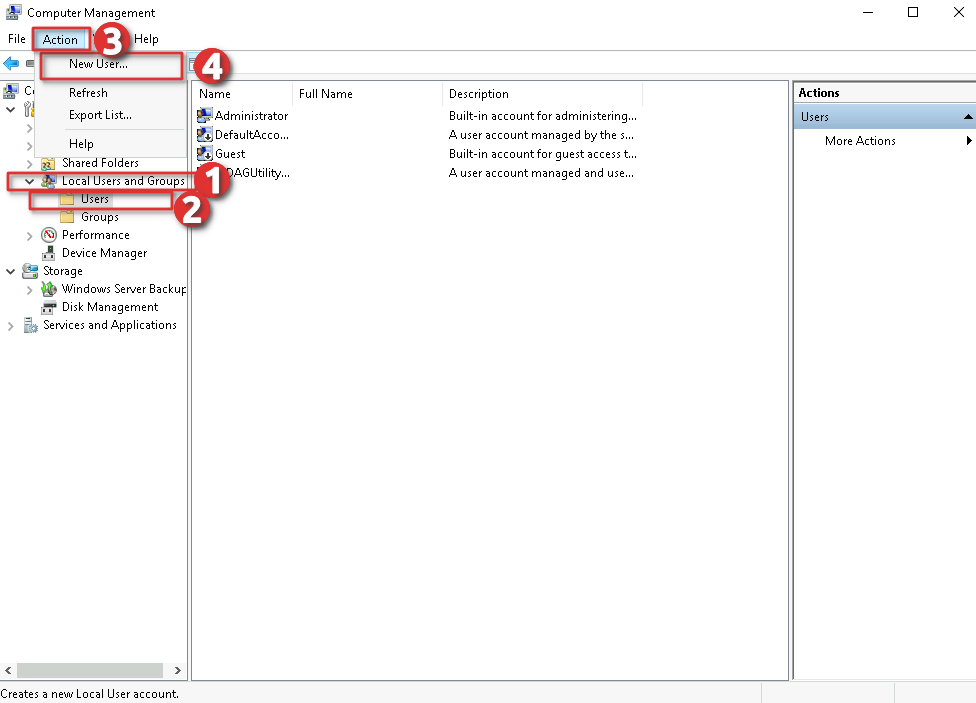
In the Computer Management window, follow — Local Users and Groups — Users — Action and click on New User.
Enter a User name and Password.
Next, you should share the directory for FTP users, follow — Server Manager — Tools — Internet Information Services (IIS) Manager.
To transfer files, you should add an FTP site. Once the FTP site is enabled, clients can transfer to and from the site using the FTP protocol.
Enter FTP site name and Content Directory, click on Next.
Bind IP address and Port and select SSL options.
Now you should select Autentification. In my case, it will be Basic, since I do not need Anonymous connections. Further, in the Authorization section, select the Specified users from the drop-down list and select a created user. We put checkboxes for permission to read and write in our shared directory.
Congratulation, you have successfully installed and configured the FTP server on Windows Server 2019. We have also collected in one place the most popular server models for work from Unihost


